The AllScan UCI145 and UCI150 USB Communications Interfaces are professional-grade yet low cost USB Audio+PTT communications interfaces for use with AllStar, EchoLink, SDR, remote rig control, and Radio-Over-IP (ROIP) applications. These are designed and optimized for use with communications microphones, speakers and other audio equipment, and are not intended to directly connect to radio transmitters or receivers.
UCI145 Schematic (Main Board) / UCI150 Schematic (Main Board) / Schematic (Mezzanine Board) / Schematic (Mic Adapter Boards)The UCI145 is a simplified version of the UCI150 that supports only Alinco RJ45 and compatible mics, whereas the UCI150 integrates a Universal Mic Adapter system supporting nearly any RJ45 mic brand and model. The UCI145 and 150 have the same front and back panel controls, jacks and LEDs.
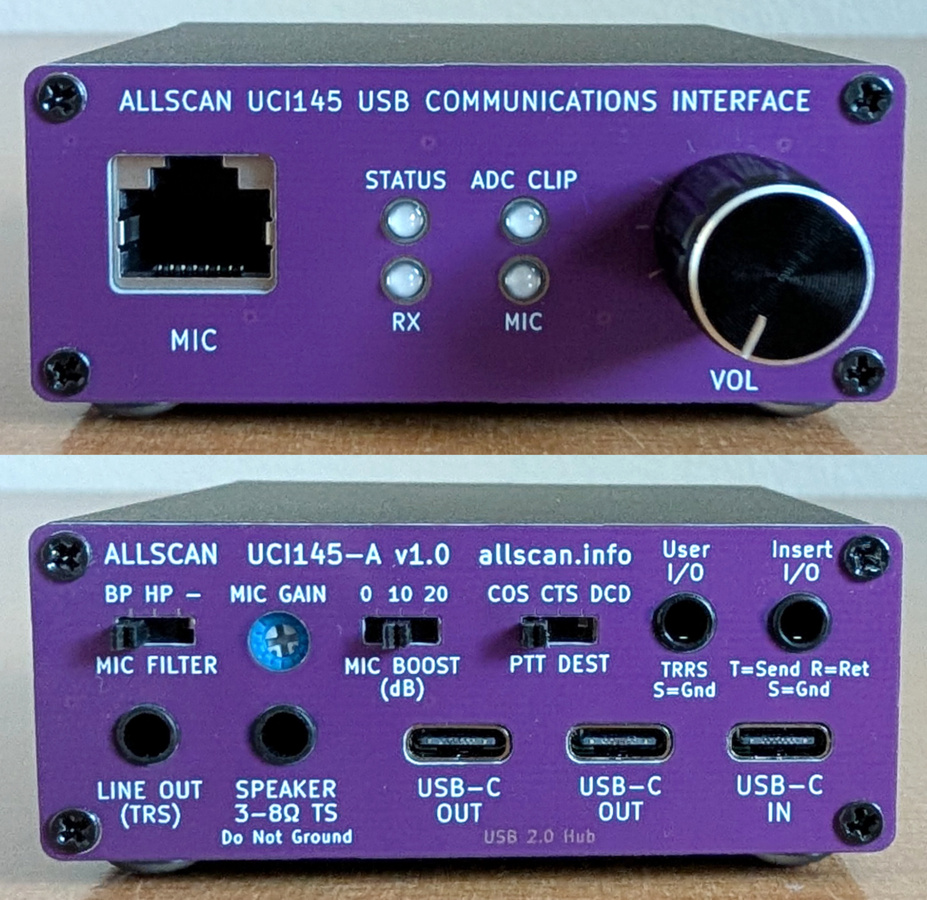
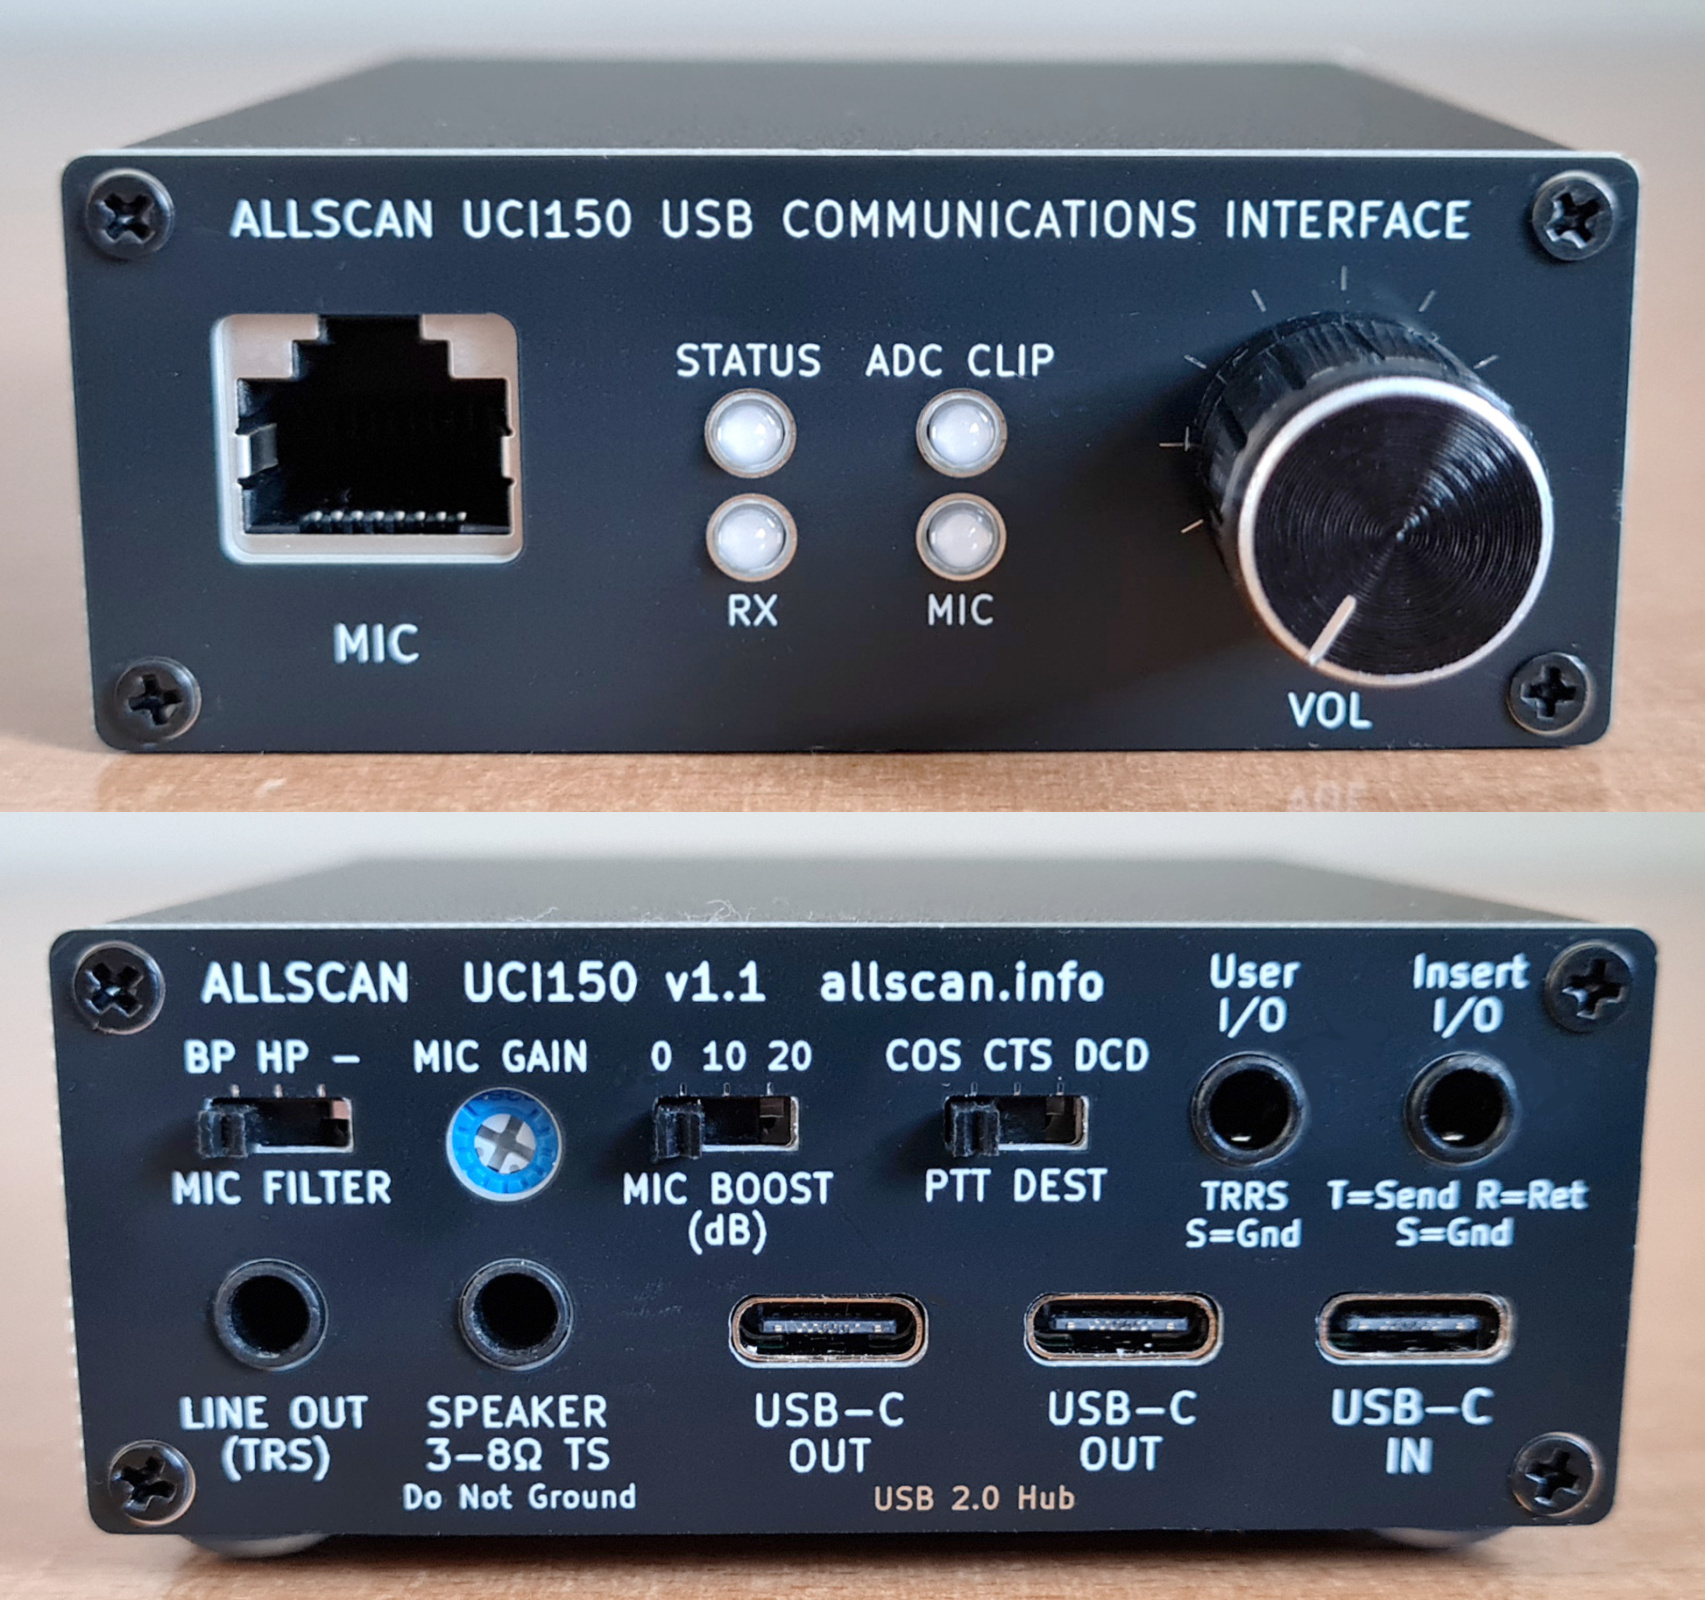
Enclosure size: 2.9"W x 1.1"H x 3.2"D (74x29x80mm)
Features
- Compact radio-less interface supporting RJ45 mics, 2.5W audio amp, 3.5mm TS Speaker Out and TRS Line Out
- Supports Mic PTT routing to CM108 COS or to integrated USB-UART CTS or DCD for broad application compatibility
- Internal Mic Adapter Board headers support virtually any mic type, brand and model (UCI150 only), and support routing of mic Up/Down buttons and serial keypad data to the integrated UART. On the UCI145 the Mic Up/Down buttons connect to the UART RI/DSR lines to support application parameter adjustments / GUI control
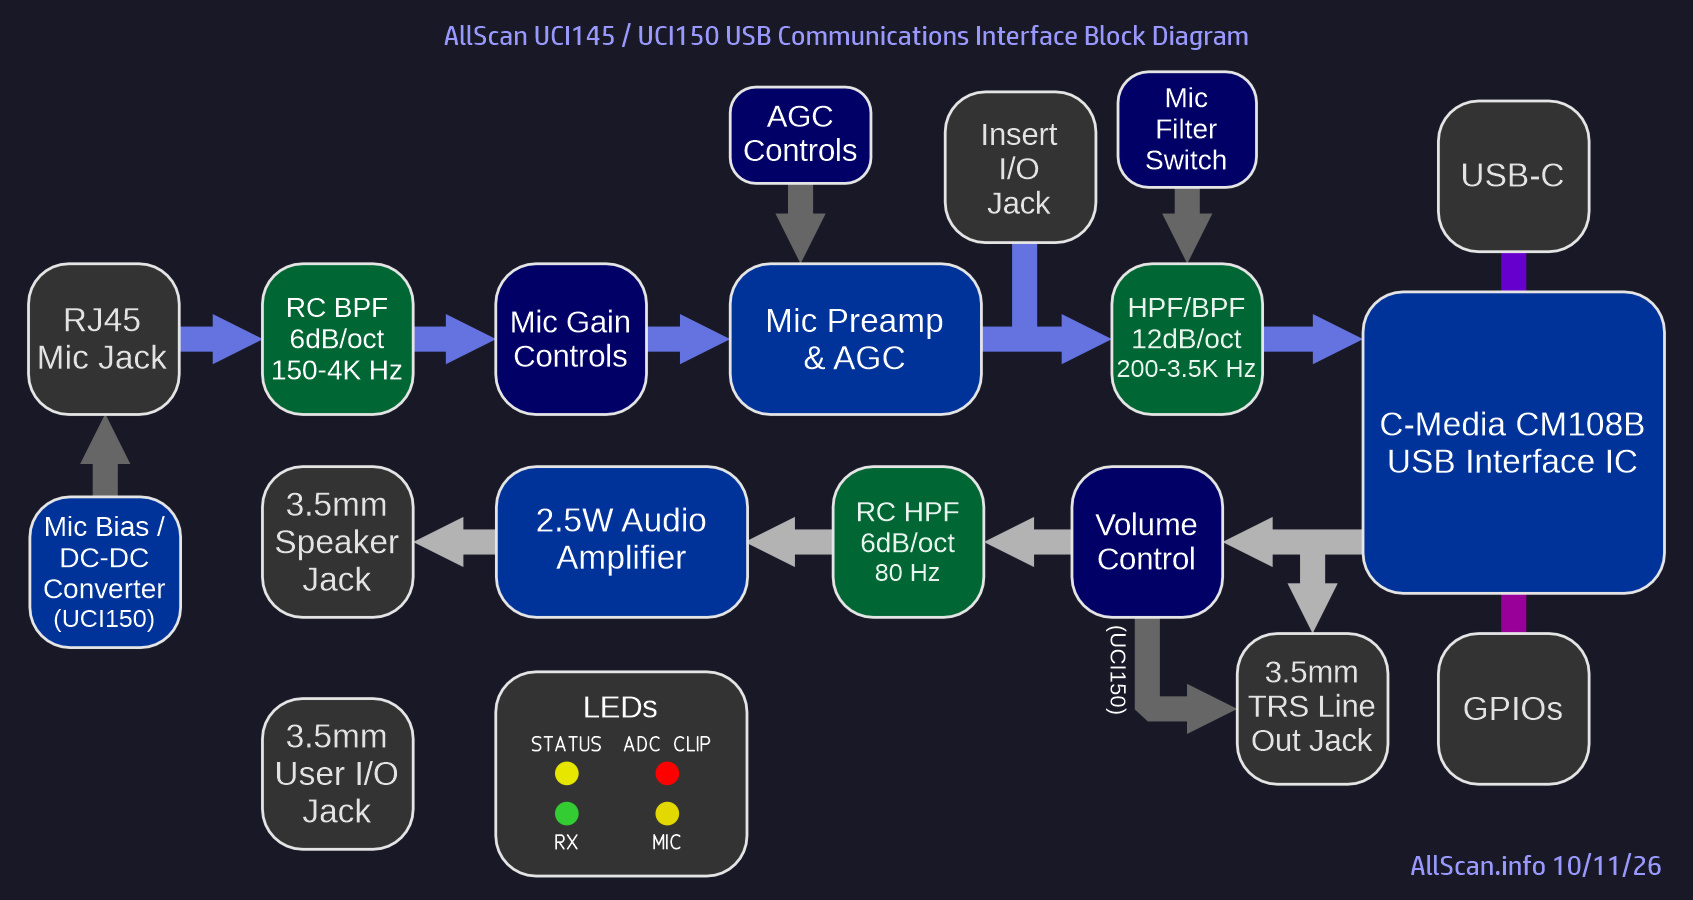
- Mic Gain Adjust and Mic Boost controls provide a 50dB gain adjustment range supporting a wide range of communications microphones and dynamic mics. An internal 10Ω–0.5mF filter on the analog power supply ensures the lowest possible noise, particularly with older preamplified mics that do not have good supply voltage filtering or mics that combine audio and power on one line
- Switch selectable 200Hz & 3.5KHz 12dB/octave mic audio highpass and bandpass filters
- 6dB/octave bandpass filter ahead of the AGC mic preamp, and 6dB/octave highpass filter ahead of the speaker amp reduce ADC clipping and AGC gain-pumping, and minimize thumps, clicks and other background noise. These filters have a smooth response curve supporting extended frequency response for other audio applications
- Insert I/O jack supports additional mic audio processing, mixers, other audio systems or line level Aux In. 3.5mm Tip=Send (from AGC out), Ring=Return (to ADC in), Sleeve=Ground
- Thru-hole pads on PCB provide easy access to nearly all CM108 and UART I/O lines
- Comprehensive LED status indicators for USB host status, Mic PTT, Mic Signal & Clip, and RX (USB Host PTT). The signal and clip LEDs make it quick and easy to set mic input levels and minimize any risk of ADC clipping
- 3.5mm Line Out jack supports stereo TRS line out. The UCI150 has an internal slide switch supporting Pre / Post / User Configurable Volume control routing of the Line Out jack. The Line Out jack can also drive stereo headphones or headsets
- Extruded aluminum enclosure with ferrite and bypass cap filtering on all I/Os maximizes durability and EMI/RFI resistance. Optimized PCB layout with separate analog and digital power supplies and ground planes ensures extremely low noise and clear audio
- User-configurable TRRS jack can be connected to any internal header lines. For example a headset can be supported on the User I/O jack by connecting the Rx Audio (TxL), Mic Audio, and PTTIN lines
- Supports full-duplex audio with no dependence on PTT or COS. Works as a standard USB audio interface on Win, Mac & Linux in addition to fully supporting AllStarLink, Ampersand-ASL, HamVOIP, DVSwitch, EchoLink, Zello and numerous ROIP, SDR, and remote rig control apps
- Integrated High-speed USB 2.0 Hub provides 2 USB-C downstream jacks for other USB accessories, making your node setup even more space efficient
Overview
The UCI145 and UCI150 work with all known PC and smartphone OS's and ROIP / SDR / remote rig control applications, providing a professional-grade interface to amateur and commercial radio communications microphones and speakers. Because the UCI145/150 does not connect to a radio, no PTT output is needed from the USB host application. The UCI speaker output is always active and supports full-duplex communication.
AllScan UCI's are inexpensive, compact and portable, and deliver excellent audio quality and dynamics. Note however that a high-quality microphone is essential. The Products page has a detailed list of mic recommendations, and this is discussed in more detail below. The UCI145 is designed specifically for Alinco RJ45 mics, but can also support Yaesu RJ45 mics or any dynamic or electret mic that will run from 5VDC. The UCI150 integrates support for AllScan's Universal Mic Adapter boards, and integrates a DC-DC converter and internal slide switches supporting nearly any mic brand and model including Motorola, Kenwood, Icom, Yaesu, etc.
Notes for AllStar, EchoLink & DVSwitch
- AllStarLink.org has excellent documentation and support making it easy to build your own node on Intel/AMD or RPi platforms. ASL is 100% open-source and supported by a large ham community including many experts who have used it for years with complex interlinked repeater systems.
- Dell Wyse 3040 and other Thin Client / Mini PCs are widely available for $25 or less on ebay, and have the same low power consumption as an RPi3/4 but with more features, including a power button so they can be turned on or cleanly shut down simply by pressing a button, a Real-Time-Clock IC that enables powering on and off on a schedule, built-in eMMC SSD memory, a shielded case with excellent EMC performance, better thermal management, and fanless silent operation. These are full-featured FCC-Certified PCs. Dell Wyse 3040's are 4"x4"x1.1" in size, barely larger than an RPi.
- There's no reason to settle for nodes with noisy audio (< 50dB SNR), substandard RF performance, or closed-source software. ASL3 brings AllStar up to the latest Debian Linux and Asterisk versions while making a number of other major improvements and fully supporting x64 and RPi platforms.
- Radio-less nodes automatically support Full-duplex, enabling more interactive and more efficient communications, preventing doubles, and improving situational awareness. Full-duplex smartphone VOIP/IAX apps and SIP phones can also be used with the node.
- The DVSwitch ASL distribution supports bridging to digital modes such as P25, D-STAR, YSF, DMR, etc. and is also fully open-source.
- AllStar nodes also support EchoLink with some simple configuration settings. If there are repeaters you know that support EchoLink but not AllStar I recommend asking the owners to also support AllStar. AllStar provides higher audio quality and many features that are not available in EchoLink.
For instructions on how to set up an AllStar node see this How-To Guide, which thoroughly covers all needed setup and configuration steps, and covers the history and fundamental design details of AllScan UCIs.
Warranty
All AllScan products are warranted against defects in materials and workmanship for 1 year from the date of original sale. Note however that the warranty does not cover damage to RJ45, 3.5mm or USB jacks.
Radio-less Node Benefits
Radio-less nodes are ideal for use cases where WiFi or wired ethernet are available but the additional range provided by an HT or mobile radio is not needed, such as for a desk or table at your home / office / shack, for vehicles or RVs where you have a WiFi hotspot, and for 2nd offices, hotels, etc. Radio-less nodes are the simplest, easiest and most cost-effective way to get on AllStar or other ROIP networks with your own node, and are more portable than even the smallest radio-based node and radio needed to access it. Unlike smartphone or PC apps, a dedicated radio-less node provides excellent audio quality using professional-grade communications mics and speakers.
For a node that's sitting a few feet away on a desk it makes more sense to use a radioless node than to have multiple radios on transmitting 100's of milliWatts of RF. Radio-less nodes are more energy efficient, using generally less than a few Watts, vs. a node with radios plus other radio(s) to access it is easily 3 times the energy consumption.
Radio-less nodes also support Full-Duplex by default. This is a powerful feature, as described in the Full-Duplex Communication Benefits section below, and makes a properly designed radio-less node much nicer to use than any half-duplex node.
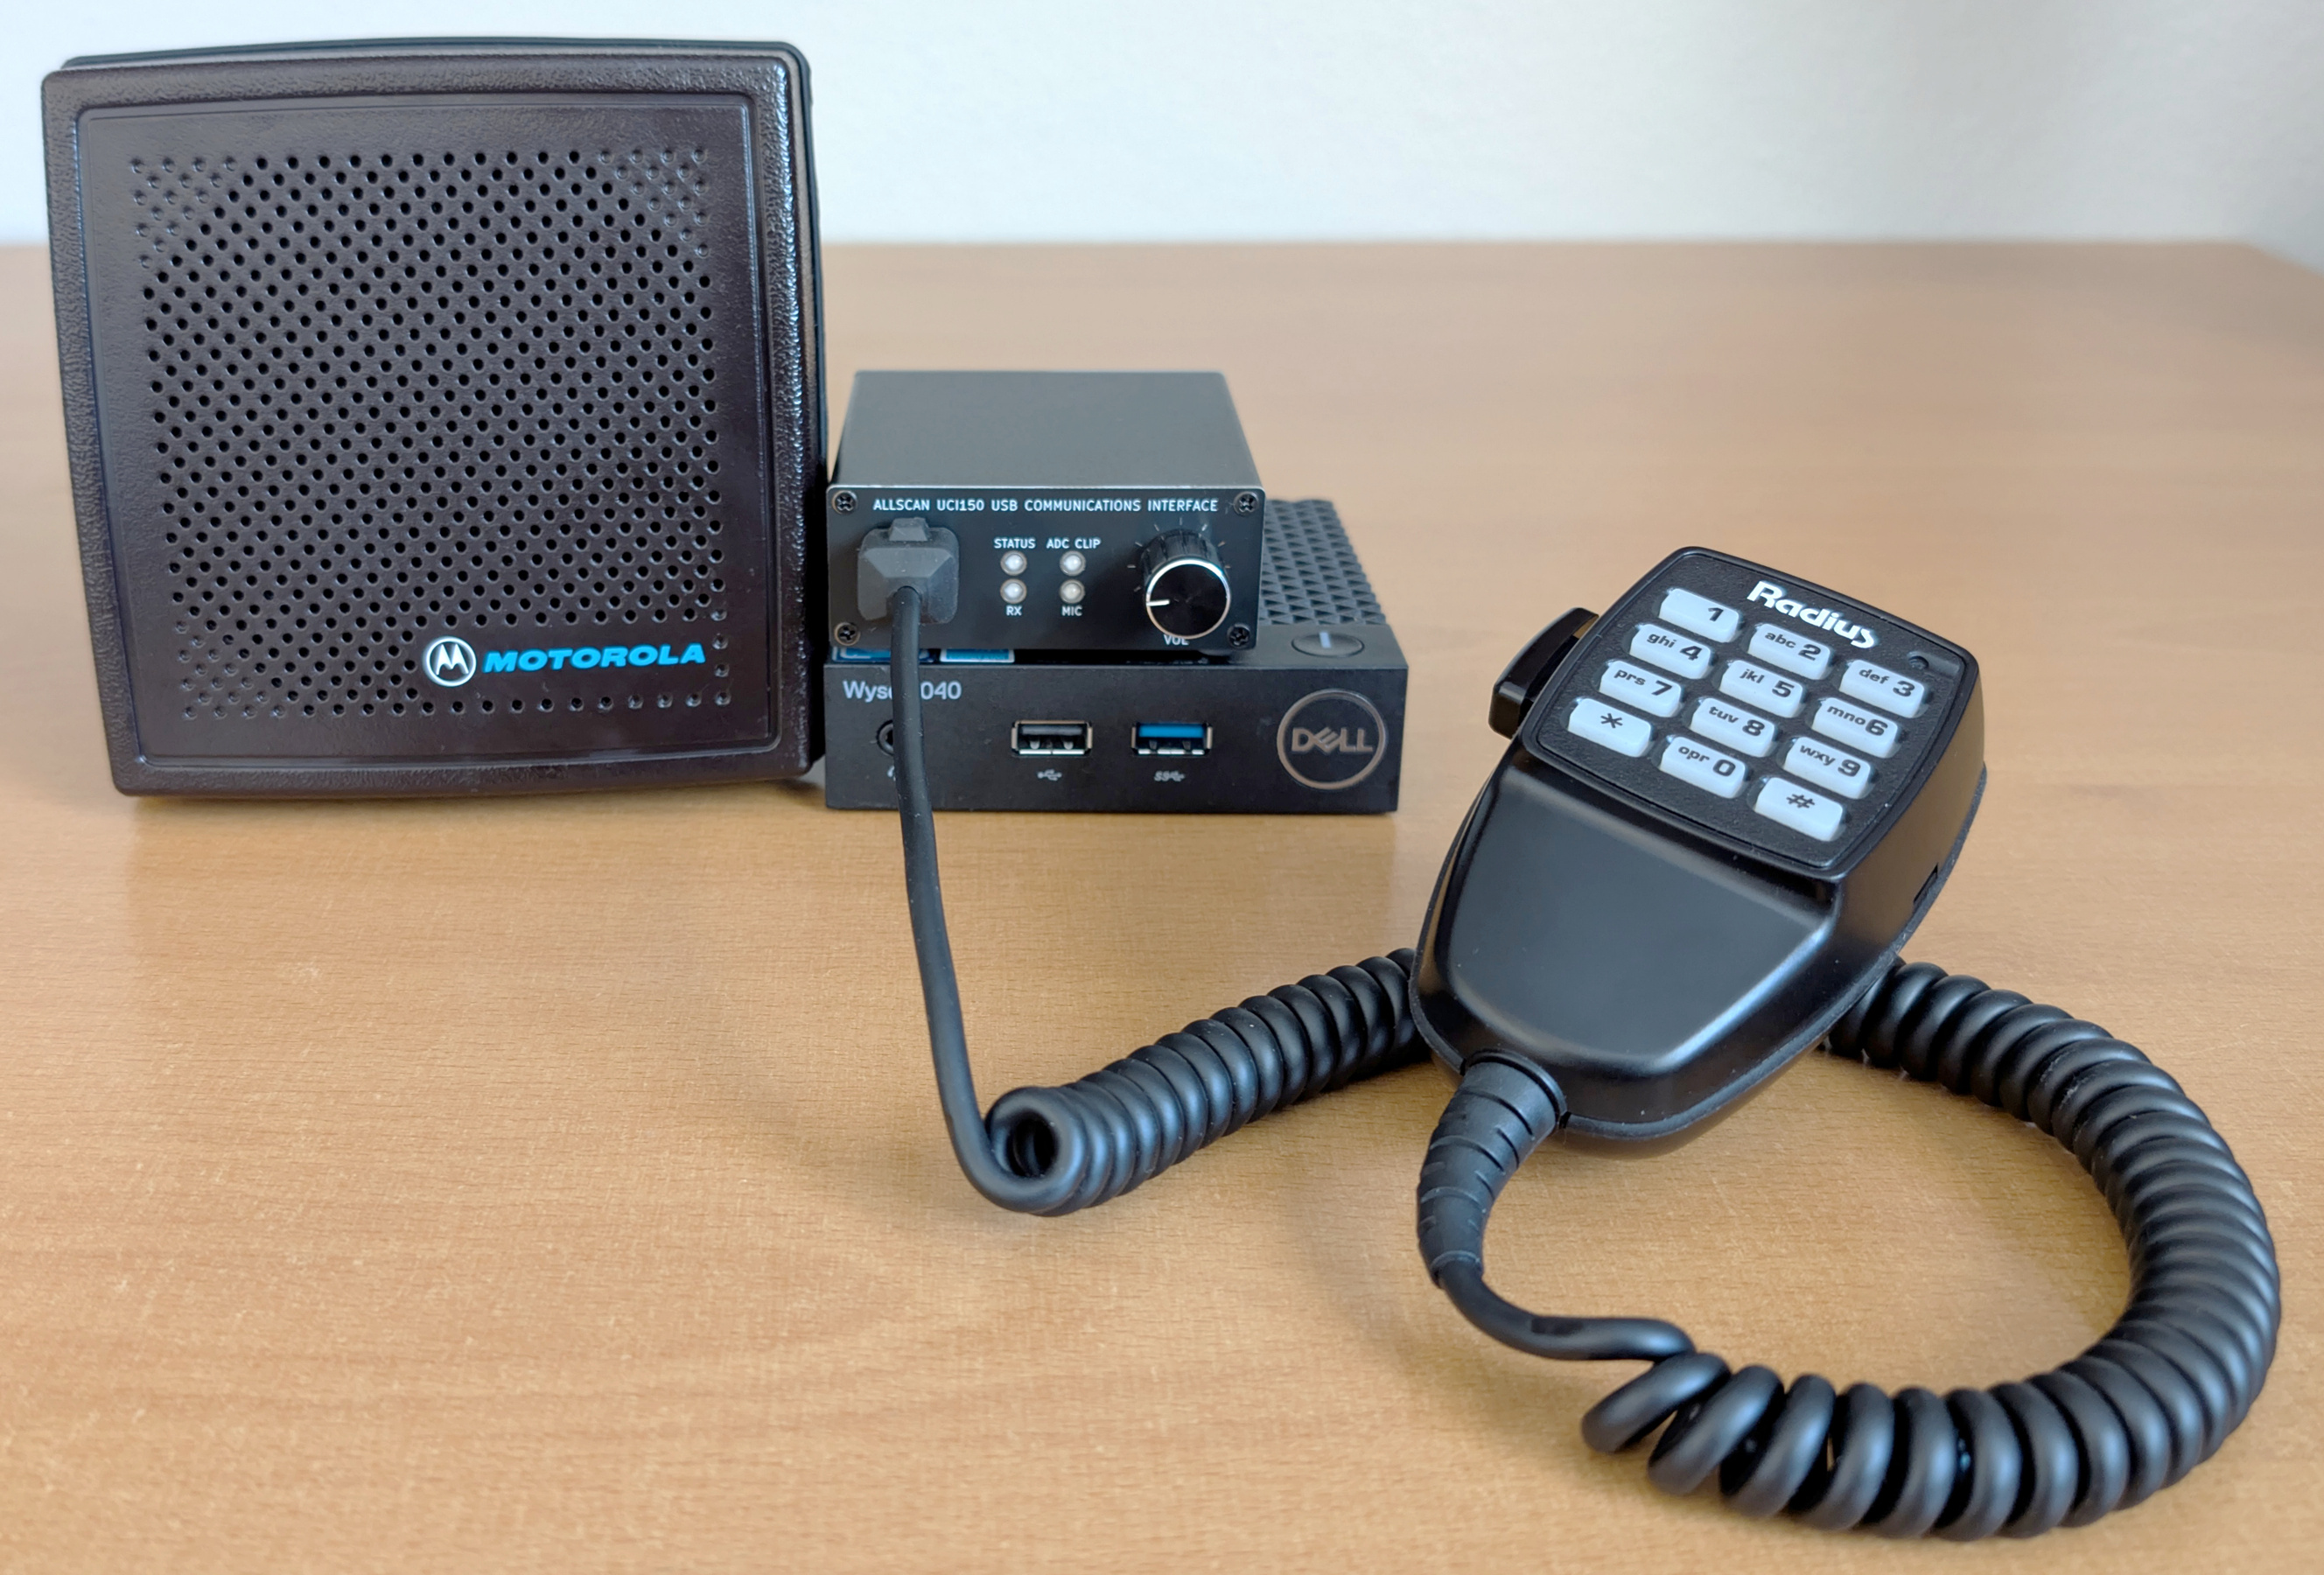
UCI150 with Dell Wyse 3040 MiniPC, Motorola DTMF Mic and Motorola Mobile Speaker
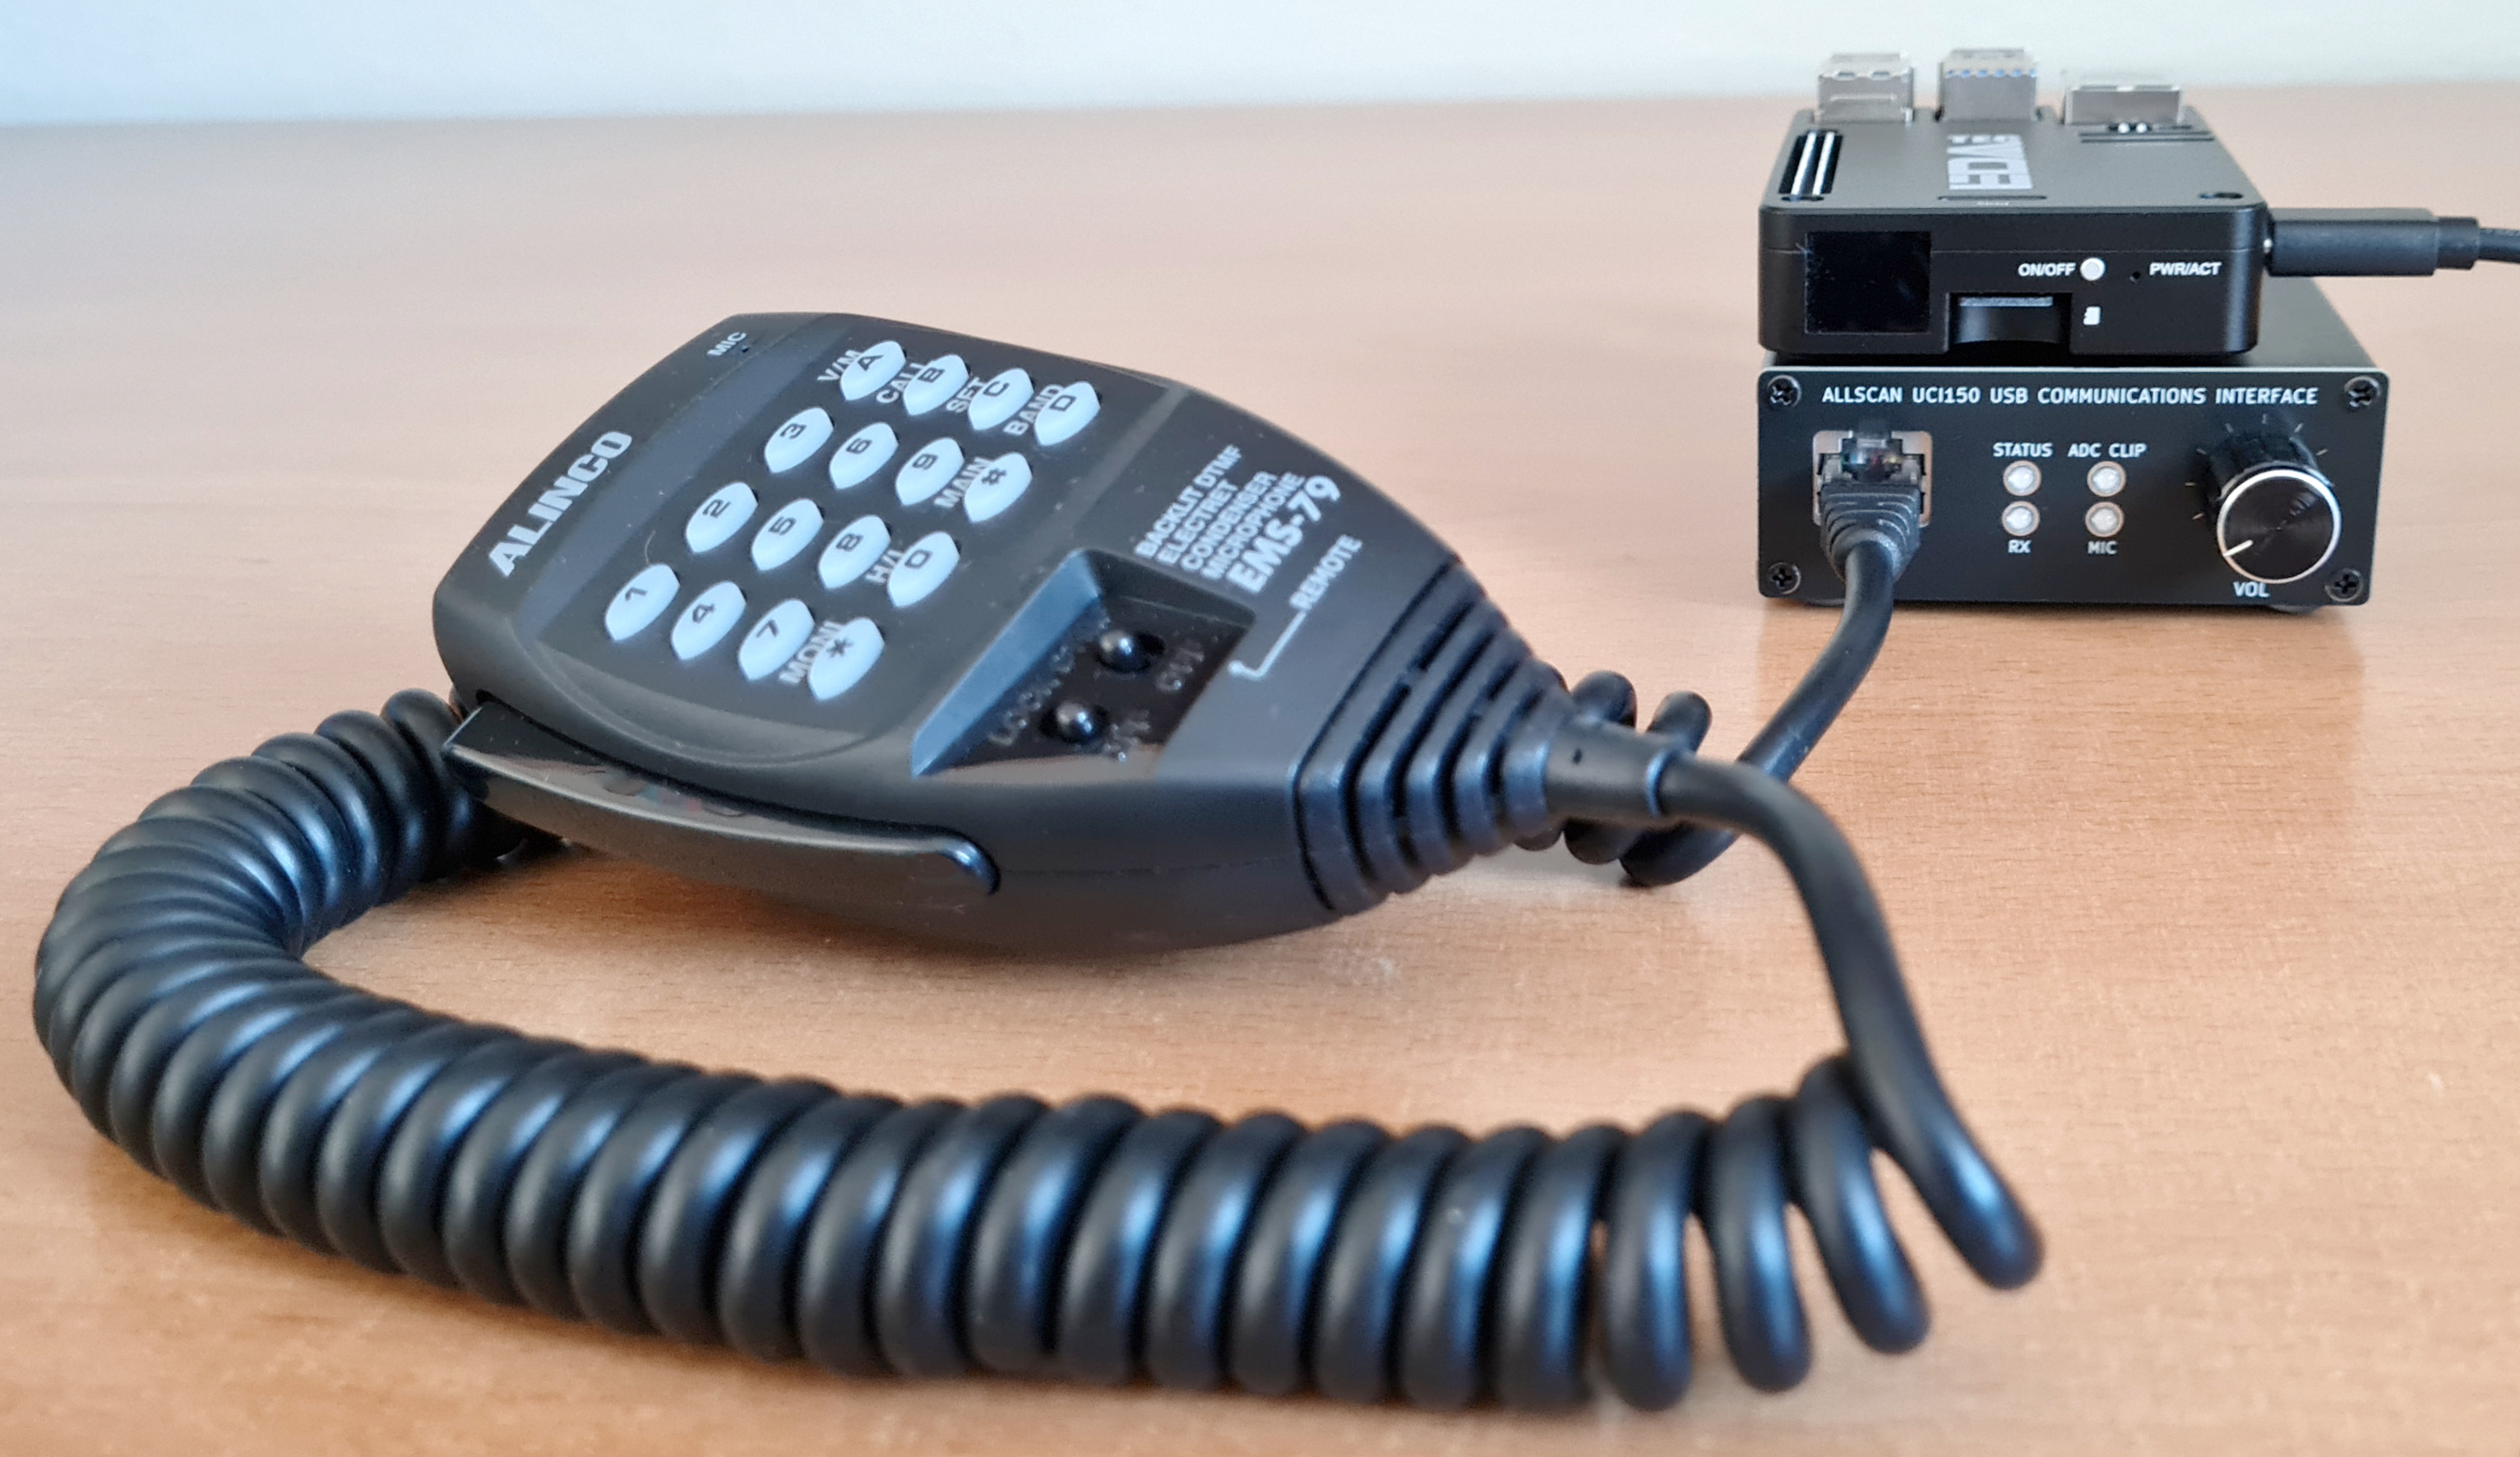
UCI150 with Raspberry Pi5 SBC and Alinco EMS-79 DTMF Hand Mic
UCI150 PC Boards and AllScan Universal Mic Adapter Boards

Revision History / Schematic Notes
For schematics of earlier versions see the AllScan-Products GitHub repository. Note that the version number is shown on the PC Board. (The back panel version number refers to the top-level product assembly.)
Internal Switch & Trimmer Potentiometer Settings
The UCI145 has no internal switches or trim pots. The UCI150 provides 3 slide switches and a trim pot for adjusting the Mic jack supply voltage and bias voltage, and the routing of the Line Out jack. These settings are clearly marked on the PCB. Refer to the schematic for more details. If you have any questions about how to switch out the mic adapter board and configure the associated switches and trim pot see the UCI200 product page which has a video showing how to switch the Mic Adapter boards, and feel free to send me an email.
Mic Options
You may already have a microphone with an RJ45 plug that should work fine with the UCI150, and you probably already have an external 3 - 8 Ω speaker with 1/8" (3.5mm) plug. The Alinco EMS-79 is a good mic that is very well made and has a built-in DTMF keypad and encoder. Some other mics with keypads don't actually have a DTMF encoder and instead send serial data out expecting a radio to then generate the DTMF tones. Be sure to carefully review the schematic and pinout of any mic before using with an AllScan UCI. A variety of other mics can also be used. Icom HM-154T DTMF mics sound very good. Battery powered mics are also a good option such as a Rode NT3 with an Inrad DMS-1 desk mic stand.
AllScan is an authorized Alinco reseller and we have EMS-79's in stock for immediate shipment. The genuine EMS-79 sound literally 10 times better than the $20 counterfeit EMS-79's available on amazon/ebay/etc. The genuine Alinco has a much fuller sound, better presence, much lower handling noise, and a longer more pliable coiled cord.
Kenwood MC-60A, MC-80 and MC-85 desk mics are great options that sound better than pretty much all hand mics, work fine on 5V (no batteries needed), have built-in preamps and work perfectly with AllScan UCIs. The Icom SM-10, SM-30 and SM-50 are all excellent sounding mics. An MFJ-1263 Mic/Radio Switch Box is a great way to connect multiple brands of mics to various radios or UCIs. In my experience the Kenwood MC-60A is the best mic I have heard for use with an AllScan UCI.
Speaker Options
Any 3 - 8 Ω speaker should be fine but for good audio quality I would recommend a small mobile speaker from Icom, Kenwood or Yaesu such as an SP-35 or MLS-100 which are around $30 or so. Old Heathkit, Motorola, Kenwood and many other vintage speakers often sound excellent and can be easily found for $25~$50.
AllScan UCI speaker amps has plenty of volume for most environments, but for louder environments eg. driving on the highway with the windows down you may need something a bit louder. AllScan UCIs will put out 2.5W @ 4Ω and 1.5W @ 8Ω, and the Line Out jack can be used to go into any boombox, car or home stereo Aux In jack or powered speaker.
Specifications
AllScan UCIs use a C-Media CM108B USB Audio Controller IC, which have the following specifications:
- Usable input range (supporting full ADC dynamic range) of -18 to 6 dBVrms, which corresponds to IC mixer gain settings of 34 to 11 (1dB steps)
- ADC stated SNR is 90dB, DAC stated SNR is 93dB
- ADC frequency response is 100-20K Hz ±3dB, but response below 100Hz is still usable (~-6dB)
Host PC Options
There are a number of options for inexpensive but high quality MiniPC's / RPi's:
- Dell Wyse 3040 Mini PC. These have been used in 1,000's of nodes and are cost-effective, compact and reliable. They can be found for as little as $25 on ebay with AC adapter, however most sellers are not clear if the 3040 has WiFi, is a 5V or 12V version, if it has 8GB or 16GB eMMC, or if it has the correct AC adapter; It can thus be time consuming to find the best deal with the options you want. Fortunately I stock refurbished 3040's that have had the RTC battery replaced if it measured <3V, eMMC wiped, and everything properly cleaned and checked out. The 3040 design is well thought-out with excellent thermal management and no fan to pull dust inside. If getting a used one that's more than a few years old I recommend checking the small backup battery and replacing it if below 3V. Replacement CR2032 batteries are available for as little as $1 ea. The case pops open with no tools needed and you can then also confirm if it has built-in WiFi. Many 3040's have the internal WiFi card and antennas even though many ebay sellers don't mention it. I usually have numerous refurbished 3040's in stock at reasonable prices.
- Lenovo M75n or M90n NanoPC. These are powerful, well designed and relatively compact. These can be found for <$150 with i5-8265U or Ryzen 3 Pro CPUs, 8GB RAM and 128+GB NVMe.
- Raspberry Pi 5. RPi5's are a good option if used with a high-quality case, heat sinks and PD-capable power supply. RPi's however are well known for being susceptible to SD Card and EEPROM corruption if power is removed without a proper shutdown having been done, thus I do not recommend them where high reliability is important.
- Arduino Uno Q. These are low cost, have 16 or 32 GB eMMC, 2 or 4 GB RAM, and have Debian Linux preinstalled. They can be a little trickier to set up than MiniPCs or RPi's but they work well and have some interesting features.
AllStar Node Setup
If you do not already have a MiniPC or RPi running the latest ASL this section will guide you through the setup process. Also see AllStarLink.org for more information and the ASL Manual.
If you already have a host PC/RPi set up be sure to carefully review the recommended configuration settings below before connecting the UCI. There are some ASL settings that must be changed from the defaults.
Dell Wyse 3040 MiniPC
Installing ASL3 on a Dell 3040, other Mini PC, or Laptop/Netbook is not hard if you're experienced in building/maintaining PCs. The 3040's have a UEFI-only BIOS that needs a boot file in a specific place. Making a UEFI USB drive is simple: Download the amd64 ISO from debian.org/CD/netinst/, then format the USB drive as FAT32 and unzip the ISO into the root folder (7-Zip is a good program for unzipping ISOs). Do not try to make the USB drive "legacy bootable".
There have been rare cases reported where people were not able to properly copy ISO files to a USB drive but were finally able to get it working using "Rufus", a free program that can create UEFI USBs. It's probably not going to do anything that 7-Zip wouldn't but maybe it has fewer options and thus is more resistant to user error.
To initially set up a 3040 requires a USB keyboard and a monitor/TV with a DisplayPort cable. Plug in the keyboard and DisplayPort cable, and plug in the Debian USB drive. Power up the 3040 and when you see the Dell logo hit F2 to enter BIOS setup. Some 3040's may have a BIOS password which defaults to "Fireport". This can be cleared in the Security section or if some other password was set can be cleared with a button on the PCB. You should then Wipe the eMMC using the Wipe option in the Maintenance section. This is very important to do to ensure that the eMMC is fully functional, and will then also speed up the OS install. If the eMMC wipe fails you should return the 3040. All 3040's I sell have already had the eMMC wiped as part of my refurbishing process. Recommended BIOS settings:
System Configuration
→ UEFI Network Stack: Disabled
→ Integrated NIC: Enabled (NOT w/PXE)
→ USB Configuration: Enable all checkboxes
Secure Boot: Disabled
Performance
→ Intel SpeedStep: Disabled
→ C-States Control: Disabled
→ Limit CPUID Value: Disabled
→ Intel TurboBoost: Enabled
Power Management
→ AC Recovery: Last Power State
→ USB Wake Support: Disabled
→ Wake on LAN: Disabled
POST Behavior
→ Fastboot: Thorough
→ Extended BIOS POST Time: 0
Virtualization Support: Disabled
Do not skip any of these settings - ASL may not function optimally without some of them. Nothing should need to be changed on the boot order page or any other pages. Once you have confirmed the BIOS settings, save and exit, and it is advised to then hit F2 again and double-check that all settings were in fact saved properly. (If the "Secure Boot" setting was enabled it usually has to disabled twice ie. there seems to be a bug where the setting change doesn't take effect on the first attempt.) Then after the unit reboots and you see the Dell logo hit F12 for the boot menu, then select the USB drive. The Debian installer menu will then appear.
The Debian net install image is intended to boot on a removable device and install Debian on an internal storage device (or on a separate removable USB drive / SD Card). This differs from the RPi "appliance" image which goes on an SD Card, into the RPi, and the OS install is done. The Debian install takes about 20 minutes to complete. The default options should be fine but if there is anything you are not sure about, do a web search from another computer and try to clarify any questions you have. The ASL2 image did not have the boot file where 3040's need it to be (/boot/efi/...), requiring an extra step to copy the boot file, but fortunately the Debian installer provides this option.
- Select the "Advanced" non-graphical install option as it will better explain each step and not skip any important details. Other options may not show the "Force GRUB install to EFI path" option which is required for 3040's.
- Install to the internal eMMC drive, overwriting ALL existing partitions.
- Select your preferred Desktop Environment (should be none if the 3040 has only 8GB eMMC or if you do not plan to use the 3040 with a keyboard and monitor, otherwise KDE is recommended), and select "web server" and "SSH server" options to install.
- When prompted to create a user account, do not enable a login/password for the root account (this is more secure), and be sure to write down the name and password you enter for your user account.
- The "Force GRUB install...to EFI..." option is required for Dell Wyse 3040's. Select Yes for this step.
Installing on other Thin Client models or on a Netbook or Laptop should be even easier. (Note however that Chromebooks should be avoided, as ChromeOS is a closed and encumbered platform.)
A Desktop Environment such as KDE can be nice if you have a monitor, TV, or remote desktop app. This can simplify WiFi and network management but does require a 16GB 3040 version to fit everything. However ASL3 recently made an "appliance" version available for Debian 13 that adds a web management interface ("Cockpit") and integrated WiFi manager, which should now make entering WiFi details and selecting networks much easier, just by going to the node's IP/mDNS URL followed by ":9090" in any browser. With this being the case there's no need for a desktop environment, which saves several GB of space and means that 8GB Dell 3040s are more than sufficient.
Lenovo NanoPC, Beelink T5 or NucBox MiniPCs
Installing Debian on a Lenovo NanoPC, Beelink T5, GMKtek NucBox, or other similar recent Mini PC model is simple. First, make a UEFI USB drive by downloading the amd64 ISO from debian.org/CD/netinst/, then format the USB drive as FAT32 and unzip the ISO into the root folder (7-Zip is a good program for unzipping ISOs). Do not try to make the USB drive "legacy bootable".
Plug in a USB keyboard and a monitor/TV with HDMI cable into the MiniPC. Many Mini PCs include Windows 11. If you want to keep Windows you will want to let it boot and update itself (which can take over an hour) and then use the Windows Disk Management tool to shrink the C drive by 50%, ie. for a Mini PC with 128GB eMMC/SSD, shrink it by 65,535KB, thereby leaving 64GB of unallocated space, or for a mini PC with 64GB eMMC shrink the C drive by 32,767KB. When setting up Win11 I recommend during the setup specifying that the PC will be used for "work". There is no need to create a Microsoft account. In reality it is unlikely you'd ever have any need for Windows on a node MiniPC, and with the 1+ hours of time it takes a new Win 11 install to update itself, keeping Windows is probably not worth the time and hassle.
I recommend disabling all unnecessary options in the MiniPC BIOS, including Intel SpeedStep, C-States, Secure Boot, TPM module, Wake on LAN, Virtualization, Network/PXE boot, and legacy device support. Then power off the MiniPC, plug in the Debian USB drive, press the power button and you will see the Debian installer menu. The Debian install takes about 10 minutes to complete. The default options should be fine but if there is anything you are not sure about do a web search from another computer to clarify any questions. I recommend the "High-contrast", "Advanced" non-graphical install option.
- Install to the internal SSD drive. If keeping Win 11 select to install to the "largest unallocated partition", otherwise overwrite ALL existing partitions.
- Select your preferred Desktop Environment (I recommend KDE), and select "web server" and "SSH server" options to install.
- When prompted to create a user account, do not enable a login/password for the root account (this is more secure), and be sure to write down the name and password you enter for your user account.
Note: Beelink T5 MiniPCs have an internal fan and a jumper that selects if the USB Port is powered when the PC is off. The fan is not needed if the T5 is used only for ASL which uses very little CPU power, and T5s run very cool without it. The USB power jumper defaults to on which results in USB devices remaining powered when the node is off which is a waste of energy. If you would prefer the T5 to be silent the fan can be unplugged, and it's a good idea to set the USB power jumper to not power devices when the PC is off. The T5 has 4 screws at each corner on the bottom of the case that are easy to remove, just lift the ends of the rubber feet ~½" to access them. It then only takes a minute to unplug the fan and change the USB power jumper setting.
ASL3 Install
When the Debian install completes you will be prompted to remove the USB drive and power cycle the PC. Make sure it boots OK into Debian. The "hostname --all-ip-addresses" or "ip addr" command can then be used to get the node's LAN IP address. You can then SSH into the node, proceed with the ASL3 install as described in the ASL3 Manual, and provision it on the allstarlink.org Web Portal. An "appliance" option is now available for installing ASL3 on x64 (PC) platforms, which enables a web management interface with WiFi management plugin. I highly recommend this for MiniPCs that have WiFi, see this link for details.
Raspberry Pi's
RPi5's are a good option if used with a high-quality case, heat sinks and official RPi PD-capable power supply, and are easy to set up by following the detailed instructions on the ASL website. However as noted earlier RPi's have some known reliability issues and keeping a backup copy of the SDCard is recommended.
ASL Configuration
ASL3 brings Debian and Asterisk up to the latest versions and adds a number of new features and many significant improvements. Asl-menu can be used (run sudo asl-menu) to make the basic node settings – node#, password, IAX port, AMI password, and channel driver, but the .conf files should then be manually edited and all below settings confirmed. Asl-menu has become somewhat confusing and unreliable – it attempts to abstract away the underlying .conf file settings and instead present numerous pages of menus and options, but this has resulted in increased complexity and in important settings often being missed. I therefore recommend using asl-menu only to set the basic node# details, then exit, reboot the node, and manually edit the below files.
USBRadio bandpasses and limits outgoing IAX audio, which can result in a significant reduction in overall dynamic range and loudness. Thus I recommend the SimpleUSB driver as this transmits the mic audio over IAX exactly as it came in from the ADC. USBRadio's limiting and bandpass filtering could be useful if they were more flexible but there seems to be no option for makeup gain thus all audio is limited to ~-10dBFS. Tests on a Dell Wyse 3040 doing a full-duplex parrot test showed that the SimpleUSB driver and USBRadio driver in various modes use only about 10% total CPU, thus there should be plenty of headroom on 3040s and similar mini PCs.
rpt.conf Recommended Settings
rxchannel = SimpleUSB/[node#]
duplex = 3                     ; Full-duplex, do not repeat Rx audio to Tx audio
hangtime = 100
althangtime = 200
;linkunkeyct = ct8             ; Comment out to prevent courtesy tones when connected
holdofftelem = 1
telemdefault = 0               ; Prevent "node X connected to node Y" messages
; Uncomment following lines:
921 = cop,21                   ; Enable Parrot Mode
922 = cop,22                   ; Disable Parrot Mode
In ASL3 there may be 2 rxchannel lines, one with dahdi/pseudo and the 2nd with SimpleUSB/[node#]. Those lines should not need to be manually edited.
NOTE: I often get emails from people who have NOT made the below settings and then wonder why their node is not working. The below settings are required.
simpleusb.conf Required Settings
rxboost = no
carrierfrom = usbinvert
ctcssfrom = no           ; Important! ASL won't see COS if this is yes
deemphasis = no
plfilter = no            ; 'no' for increased bass / 'yes' to reduce low frequency noise
clipledgpio = 1          ; Supports ADC Clip LED
legacyaudioscaling = no
ASL3 Clip LED Support
AllScan UCIs support the ASL3 ADC Clip Detect feature. To enable this be sure you are running ver. ≥3.0.5 and that you have the "clipledgpio = 1" line in simpleusb.conf (or usbradio.conf if using the USBRadio channel driver). The ADC Clip Detect feature checks the raw ADC data stream for sequential clipped samples. Be sure to reduce the Mic Gain Adjust / Boost controls if the Clip LED illuminates. AllStar audio levels should ideally have at least 3-6 dB of headroom between your maximum audio levels and where clipping starts to occur, otherwise your signal could be overly loud and distorted. To test that your ASL version correctly supports setting GPIO1 you can run the Asterisk CLI ("sudo asterisk -vvvr") and then enter "rpt cmd [YOUR NODE#] cop 62 GPIO1=500". The Clip LED should then illuminate for 500mS.
SimpleUSB Tune Menu Audio Level Settings
A txmixaset level setting of 999 is recommended to ensure the volume knob has the widest range of control, then rxmixerset should be set to around 500, which may vary with the mic used, how loud you talk, etc. I recommend keeping the Mic Gain Adjust trimmer at 50% (-6dB), the Mic Boost switch at 0dB and changing those only if needed for a particular mic that has higher or lower output levels. The USBRadio driver can also be used with similar settings though would not likely provide any advantage over SimpleUSB. Also see the Setting Audio Levels section of the ASL manual for tips on setting levels optimally.
Node Management
Installing AllMon and then AllScan is highly recommended. AllScan provides a Favorites Dashboard with integrated ASL Stats scanning. This makes it easy to add favorite nodes and see their Tx & Rx activity and Connected Link Count stats in real-time (typically 1-minute resolution). These apps can be used in any web browser.
AllScan Favorites Management & Dashboard Web App

Wi-Fi Support
Wired-internet is more reliable and easier to set up but for a portable node wireless connectivity is important. USB WiFi adapters are inexpensive and fairly easy to set up if you have basic familiarity with Linux. Linux seems to be very good at supporting WiFi devices if they are present when the OS is installed, however if you later add a USB WiFi adapter some significant debugging may be required to get the drivers and network manager properly set up.
Many Dell 3040's come with an internal WiFi card and antennas that work well. Otherwise a cheap USB WiFi adapter should work for short-range communication but I would recommend a reputable brand that's known to work well on Debian Linux and that has a proper antenna. With WiFi frequencies starting at 2.4GHz you'd want at least 1/2λ or 5/8λ ie. 6-7cm antenna length. Any adapter that's smaller than that is probably not going to have good performance. The TP-Link "Archer T2U Plus AC600" look good and are < $20. I would suggest testing and confirming on any potential adapter that signal strength, jitter, packet loss, etc. are acceptable at various distances from your WiFi router.
AllStar and other VOIP / communication applications require low-latency, reliable IP connectivity, and extra care is required to ensure any WiFi devices and networks used are properly set up. If you ever experience audio issues, dropouts, jitter, etc., it is much more likely to be an issue with your network configuration than with ASL or the node itself.
If you use WiFi on a node you should have basic familiarity with Linux and configuring the various settings. Eventually some setting or driver may need to be updated or debugged. Like anything with computers this is not hard to do, just do a web search for what you want or what issue you're seeing and dozens of web pages with plenty of answers will usually come up.
Wi-Fi Setup for nodes with no Desktop GUI (Command-line Only)
This Article has detailed instructions on how to set up WiFi on Debian. This process does require knowing the node's IP address (which can usually be found on your router management page) and initially connecting to the node through ethernet with an SSH app. This may not be easy to do on networks that you do not manage but there are ways to make that easier, for example you can set up a command in ASL to say the node's IP address in response to a DTMF command. On all nodes I ship I have DTMF commands *690 and *691 set up to say the node's LAN and WAN IP addresses. See the AllScan FaceBook Group for details on how to set up these commands, plus many other tips and updates.
Before configuring WiFi as described in the above article you may need to run the following steps: "sudo su", "apt install wireless-tools net-tools wpasupplicant", then run "iwconfig" and confirm a wireless interface is listed. On a Dell 3040 with internal WiFi module this shows a wireless interface named "mlan0". You may then need to run "ifconfig mlan0 up" to start the interface. "iw mlan0 scan" should then list the available networks, or run "iw mlan0 scan | grep SSID" to see just the names.
After first setting up WiFi on a 3040 I was seeing a lot of jitter and audio dropouts but after disconnecting the ethernet cable, restarting my WiFi router and restarting the node, everything worked perfectly.
Another way to set up WiFi on Debian is with iwd, which may be slightly simpler vs. the article above. See this Article for details.
Wi-Fi Setup for nodes with a Desktop GUI
To simplify WiFi network management a Desktop Environment (DE) can be set up on the node such as KDE or MATE along with a small LCD monitor and USB keyboard/trackpad – or use an inexpensive Netbook or small Laptop instead of a MiniPC. Connecting is then as simple as clicking on the network icon and selecting the WiFi network. The DE should then be configured for auto-login so that WiFi will auto-connect after bootup without needing to turn on a monitor and manually log in with a keyboard. The KDE desktop is recommended for MiniPC's/RPi's with ≥16GB eMMC.
KDE is able to automatically enable/disable WiFi based on ethernet connected status, but it seems MATE does not have that option. This Post shows how to set up a Network Manager script that automatically turns Wifi off or on when ethernet is or is not available, which should help ensure WiFi is not left on when not needed.
If you often travel and connect to various WiFi networks, using a small laptop for the node computer rather than a 3040 can make things much easier to manage. These are available for <$150 which is a quite a deal considering they include an LCD, keyboard, trackpad and battery. This makes for an innovative node product that in addition to being an AllStar node works as a regular laptop and runs 1,000's of free programs available on Linux.
Node Notes / Instructions
Visit the Notes / Instructions page for useful notes regarding the general operation of any AllStar node.
Troubleshooting
If you get distorted audio or stuttering/dropouts, make sure all your port settings match on the ASL site for both the server and the node, and that those match the port settings in iax.conf (bindport), rpt.conf ([node#] = radio@ip:port), in the node's firewall (iptables) configuration, and in the router/cable modem. This is 6 different places the port has to be set. If it's your first node then you probably have the default of 4569 and didn't need to change anything, but if it's not your first node then a different port number is required (eg. 4570, 4571, ...), and all 6 of those places need to have the same setting. The node can still appear to be working fine if those settings don't match but the audio will be more likely to have stuttering/dropouts.
Conclusion
AllScan UCIs bridge the gap between communications audio equipment and a wide range of audio/communications apps. The platform can be easily extended to support significant additional I/Os and capabilities. For more info see the Products page.